Build a Raspberry Pi CCTV camera network
You own home-wide camera network
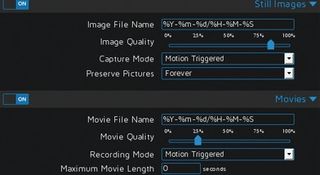
You can configure how, when and where the camera records footage using the MotionEyeOS Control Panel. The ‘File Storage’ tab can be used to specify the path to your external drive. You can also choose to upload media files to Google Drive or Dropbox. Next, head over to the General Settings tab and switch on the ‘Advanced Settings’. Work your way down to the Video Device tab to fine tune the settings. Choose a video resolution and frame rate. You may need to use trial and error to make sure the quality is consistent.
The Motion Detection tab has the option to ‘Show Frame Changes’ meaning that any movement will be highlighted in red. Here you can also alter the Frame Change threshold and ‘Minimum Motion frames’ to determine movement sensitivity. Both the Still Images and Movies tab have a rocker switch to the left to turn them on or off and both are enabled by default.
The ‘File Name’ box in both tabs allows you to specify a file name beyond the time and date.
The Capture Mode on both tabs also allows you to choose between recording only when motion is detected (default) and recording continuously. Finally, if you’re concerned about storage space, the Preserve drop-down tab allows you to delete media files after a certain length of time.
Once your Raspbery Pi Camera network is up and running, it’s essential to follow some simple steps to keep it secure.
As with installing any camera system, make sure the cameras are covering only areas where you have permission to record– in the UK this is any public area.
A sign warning visitors they are on candid camera is the courteous thing to do. Should anything happen to the principal camera running MotioneyeOS or its storage device, then any footage that you have captured will be lost, so do keep this in a secure location.
If your system is set to record video when motion is detected, bear in mind that the framerate can slow down, so if detail is important in your images, it may be better to have your cameras take a series of still images instead.
Although it’s technically possible to have more than one camera connected to the same Raspberry Pi e.g. the official Raspberry Pi Camera Module and a USB camera, this will place more strain on the Raspberry Pi and reduce video quality. It’s far better to have one Raspberry Pi per camera if you can afford to do it.
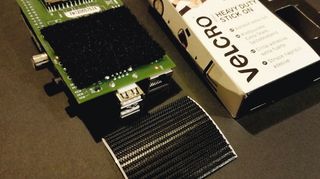
If you don’t relish the prospect of drilling into brick walls to mount cameras, you may want to try use velcro strips instead. This is particularly useful indoors as it’s simple both to install the cameras and move them around.
By default, MotionEyeOS only allows you to view your camera feeds while connected to your home network. If you’re going to be away, open the admin panel and expand the Motion Notifications tab.
Get the best Black Friday deals direct to your inbox, plus news, reviews, and more.
Sign up to be the first to know about unmissable Black Friday deals on top tech, plus get all your favorite TechRadar content.
There are settings here to upload your media files to a web service, such as Google Drive, when movement is detected inside your property. You also have option to set up web hook notifications or even to run a Python script.
This opens up the possibility to interface MotionEyeOS with servos to lock all your doors or link it with speakers to sound an alarm.
Set up your security camera network
1. Download MotionEyeOS

First, you will need to download the MotionEyeOS IMG file. Make sure it’s the correct version for your particular Raspberry Pi.
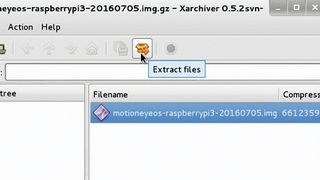
Once that’s done use your favourite archiving tool to extract the .img file. Follow these Windows instructions to install the Image to a microSD card.
2. Install MotionEyeOS to SD card
If you’re on Linux, insert your microSD card. Use cd to navigate to the MotionEyeOS IMG file, then run the following:
sudo dd bs=4M if=nameofyourmotioneyeosimagehere.img of=/dev/sdxYou’ll need to substitute /dev/sdx for the correct path to your microSD card e.g. /dev/sdb.
3. Find your Raspberry Pi’s IP addres
Safely remove the microSD card and insert into your Raspberry Pi. Connect the Raspberry Pi to your router via Ethernet cable.
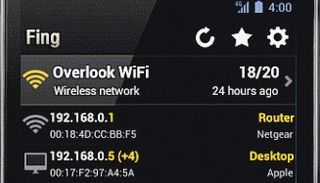
To connect to the Raspberry Pi, you’ll need to find its IP address. The easiest way to do this is by using a mobile app such as Fing , which is available for Android and iOS. It will list all devices in your network.
4. Adding cameras to MotionEye OS
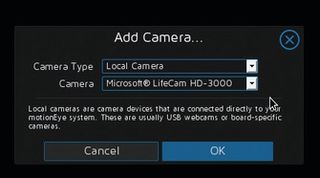
In any web browser enter the IP address of your device, using port 80 e.g http://192.168.1.20:80. This will take you to the login screen.
The default username is admin and the password is blank. You’ll be asked to click to add a camera. Choose the correct type of camera under ‘Camera Type’ and click ‘OK’.
5. Configure the camera
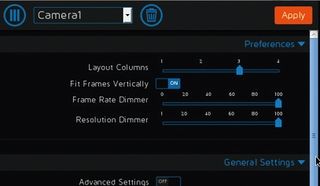
You’re now logged into the admin control panel for MotionEyeOS. Head over to the ‘General Settings’ tab and expand to set an admin password.
Under the ‘Video Device’ tab you can also set a new name for the camera e.g ‘Living Room’. Click the orange ‘Apply’ button at the top to save your changes.
6. Adding additional cameras

If you have previously set up any other cameras on MotionEyeOS, you can now add them to the main feed easily enough.
Click on the dropdown box at the top left and choose ‘add camera’. Repeat the previous step 5 to rename each camera according to its location e.g ‘Upstairs Cheese Overflow Storage’
- Enjoyed this article? Expand your knowledge of Linux, get more from your code, and discover the latest open source developments inside Linux Format. Read our sampler today and take advantage of the offer inside.
Nate Drake is a tech journalist specializing in cybersecurity and retro tech. He broke out from his cubicle at Apple 6 years ago and now spends his days sipping Earl Grey tea & writing elegant copy.
Most Popular


